Hi,
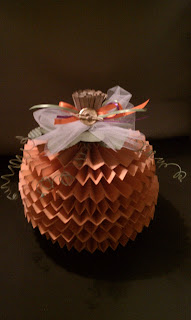
Just finished making my Paper Pumpkin. It's easy to make with 7 sheets (12x12) of Orange cardstock, 1 sheet of 8 1/2x11 Kraft cardstock, scraps of green cardstock or green patterned paper and a few ribbons.
Start by cutting your orange cardstock:
Piece# Cuts
1 3 @ 3 1/2" and leftover used to cut 12 1" circles
2 2 @ 3 1/4" and 1@ 2 3/4" and 1@ 1 3/4" with leftover to cut 8 1"circles
3 2 @ 3 1/4" and 1@ 1 3/4" and 2@ 1 1/2"
4 2 @ 3 1/4" and 2@ 2 3/4"
5,6,7 2 @ 3 1/4" and 1@ 3" and 1@ 2 1/2"
1. Sort your strips by size.
2. Accordian fold the strips every 1/2"(I used the Martha Stewart scoreboard to make it quick).
3. Adhere 3 strips of the same size together to make a long piece.(the exception is the 1 1/2" & 1 3/4" sizes each have only 2 strips). I used Yes!paste, but a stapler, or tacky glue or hot glue would work.
4. Adhere the ends to make a circle. Keep track of the sizes.
5. Get your hot glue gun ready.
6. I started with my 4 @ 3 1/4". Take one and push down on the top edge of the accordian until it flattens, pushing it toward the center to make a rosette. Hold in place and place hot glue on the center edges. Attach a 1" circle. Hold in place to set. Once set, flip it over and put more hot glue and another 1" circle. Repeat this for the other 3 1/4"circles. Edge the rosettes with brown ink (I used Distress Ink pad in Walnut). I wrote in pencil on the 1" circle of each rosette, the size of the rosette, for easy assembly.
7. Repeat #6 for all the different sizes.
Woo Hoo ! You should now have 10 rosettes edged in brown ink. Time to assemble.
The layers of the finished pumpkin will be in this order: 1 1/2, 2 1/2, 3, 3 1/4, 3 1/4, 3 1/2, 3 1/4, 3 1/4, 2 3/4, 1 3/4.
The way I assembled it so it wouldn't end up lopsided is this: hot glue the center of a 3 1/4 to a 3 1/4. Repeat this for the other two that are 3 1/4. You should have 2 sets of double rosettes. Be careful when you assemble so that they stay level. Now take one of your double rosettes and put hot glue on the center. Top it with the 3 1/2 rosette. Next hot glue the other double rosette on top of the 3 1/2. You should now have a stack of 5 rosettes which is the middle of your pumpkin. Set this aside and get your 1 3/4 and your 2 3/4. The 1 3/4 is the bottom layer, so glue the 2 3/4 on top of it. Now taking great care to keep your pumpkin level, glue your 5 stack of rosettes on top of the bottom layer. Yeah! Only 3 more rosettes to go! First glue the 3, then the 2 1/2, then the 1 1/2. We have a pumpkin!!
For the stem, cut 3 strips 1 1/2" x 11" from the Kraft cardstock. Fringe cut the long edges of the pieces. (I used Walnut distress ink on the edges before fringing them). Put glue along the uncut edge of one strip and roll it up tightly. Add the other two strips in the same manner. Use hot glue to attach the stem to the top of the pumpkin.
Time to decorate!! I used my Cricut (Flower Shoppe cartridge) to cut 2 leaves @ 3 1/2" and 1 leaf @ 4" (but you can free form cut them). I put them through my crimper for texture and added some distress ink. (you could just do a loose accordian fold and flatten back out). I used some netting and some orange, purple and green ribbon. I also attached a button. (for this button, I used a punch to cut it from scrap cardstock, then heat embossed with gold and distressed with Walnut ink. Tied on with twine). The cute curly wire is cloth covered wire from the floral department that I wrapped around a pencil.
I was able to make this pumpkin for $2. (The cardstock was on sale 4 sheets $1, and I had the rest of the items in my stash)
I hope you enjoyed making your Paper Pumpkin.

Very cute!
ReplyDeleteThis is soooo adorable!!!
ReplyDelete